
The patented Tongue & Groove Easy Hanger has been designed and manufactured to be used with approved “plank” style material such as tongue and groove, shiplap, nickel gap, and barn wood. Net/Actual dimensions of approved material is listed on individual product pages:
INSTALLATION INSTRUCTIONS
SINGLE PERSON INSTRUCTIONS

STEP 1: With the first plank already installed, slide the Tongue and Groove Easy Hanger around the existing plank next to the wall, joist, or rafter to keep the tool from moving. Leave enough space between the existing plank and the Should Stop area at the base of the arms for your next plank to slide through.

STEP 2: Lift the plank being installed from the center, or an area further away from the T&GEH, and insert the end of the plank through the remaining space in the arms.
STEP 3: Once in position slide the plank through the open space in the arms. The end of the plank can now sit inside the arms as you move to Step 4.

STEP 4: With a ladder(lift or scaffolding) in place, lift the opposite end of the plank. Scale the ladder and slide another T&GEH around the plank being installed and the existing plank to secure it in position. Shift plank left or right to desired location.
Add a third and fourth T&GEH to the center area of the plank as needed. Ensure that all T&GEH’s have been pushed into the secure position. Secure the plank in place with nail gun.
ALTERNATE SINGLE PERSON INSTALLATION STEPS: The following solo installation method is only recommended if you are using scaffolding or a lift. This step isn’t recommended when using a ladder that you have to climb up and down on.
Depending on the length of the plank you are installing by yourself and the type of elevated surface you are standing on (scaffolding or lift) some professional installers choose to lift the plank from the center and slide the Tongue & Groove Easy Hanger onto the center of the plank then onto each end to hold the plank in place.
DUAL PERSON INSTRUCTIONS
STEP 1: With two ladders or scaffolding in place at opposite ends of the plank being installed, lift both ends of the plank, scale the ladders, and lift the plank into place. At each end of the plank slide a T&GEH around the plank being installed and around the existing plank to secure its position.
STEP 2: Add a third and fourth T&GEH to the center area of the plank as needed. Ensure that all T&GEH’s have been pushed into the secure position. Secure the plank in place with nail gun.

IMPORTANT: When installing planks that have a width of 7″ or wider, you should apply adhesive rubber strips to the inside of the lower and upper arms of the tool to ensure that the arms grip properly onto the plank and do not slide off due to the increased plank weight and width. Apply rubber adhesive strips to a minimum of two tools as shown in the images below.
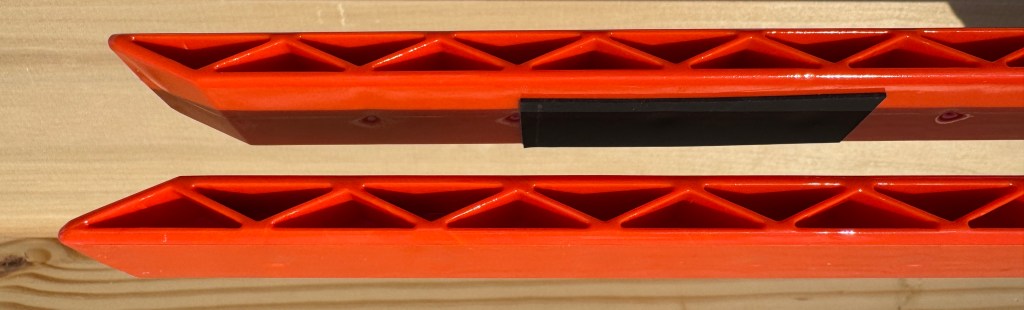
Upper Arm Application – Add 3″ adhesive rubber strip to the upper arm in the location displayed. This will press against the joint between the plank actively being installed and the previously installed plank that is already secured.
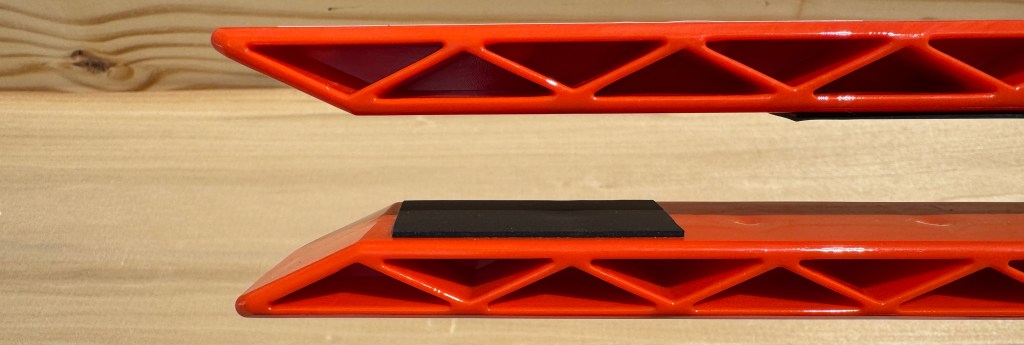
Lower Arm Application – Add 2″ adhesive rubber strip to the lower arm in the location displayed. This will press against the bottom of the previously installed plank that is already secured.
SEATING PLANKS TOGETHER: The Tongue & Groove Easy Hanger is also designed to assist in seating two planks together without damaging your material.
When the tongue of the previously installed plank does not easily slide into the groove of the plank being installed; grasp the handle of the T&GEH, then using a push and pull motion repeatedly force the T&GEH into the plank being installed until the two planks are tightly seated together.
If additional force is required strike the curved handle base with a standard, rubber, or dead-blow mallet until the tongue slides into the groove. *NOTE: If you are using the PRO version of the tool you can use a metal hammer to strike the base of the handle. If you are using the DIY version of the tool DO NOT strike the base of the handle with a metal hammer. Doing so will void your warranty. INSTAGRAM VIDEO
There will be instances when a plank will have too severe of a crook or twist in it to allow the T&GEH to seat the two planks together regardless of the amount of force used. In those instances additional tools that can assist in seating the two planks together will be required.
NOTICE
The Tongue & Groove Easy Hanger is NOT designed for:
- Installing plank material directly onto an existing finished ceiling. A framing substrate such as joists, studs, rafters, beams, or furring strips is required to mount planks, with a minimum of 11/16th inch (17.46mm) of space above or behind the plank being installed to allow for one arm of the T&GEH to slide around.
- Use with materials such as sheetrock, plywood, cement board, or other “sheet” style material.
Working overhead and on elevated platforms and ladders is inherently dangerous. Always be aware of your surroundings and ensure tools are used properly. Always wear recommended protective clothings/items such as: goggles/glasses, hardhat, gloves, etc. when working with this tool or any construction tool or equipment.
⚠️ CALIFORNIA WARNING
This product can expose you to Bisphenol A (BPA), which is know to the State of California to cause birth defects or other reproductive harm. For more information visit FAQ’s or go to www.p65warnings.ca.gov.
Tongue & Groove Easy Hanger – The Fastest, Easiest, and Safest tongue & groove ceiling installation tool.
